Putting together my SCA 14th Century Kit

Photo by Arianwen Ferch MorganA 14th Century SCA Armored Combat KitRecently I was asked to put together an overview of all the various components of my kit in a single article (as opposed to the many random social media posts from me making each piece). I'm going to do my best to detail the parts and pieces of my kit, with the understanding that I am not an armorer, but a craftsperson. I will do my best to outline how I put this kit together, the why I chose what I have, and if anyone has any questions, feel free to reach out to me. Leg Armor Lendenier/Arming GirdleWhen getting into my armor, the first piece that goes on before any other piece is my leg armor (actually it is my groin protection, but since that is just a basic athletic cup, I won't be detailing that here). My SCA persona is based off of 1350's Norwegian man at arms, so I use a lendenier (a padded linen fabric arming girdle - more information on these can be found here). Due to the fact that I'm round in the midsection, I also use a pair of suspenders to make sure it doesn't slip down, although the lacing setup on it does really well when snugged up tight.  I've also taken a set of old football pants and removed the thigh pads, which include a hard plastic plate with a padded section behind it and sewn them onto my lendenier over where my kidney's are (my lendenier is taller than most due to my physical shape, so I was able to do this to meet Midrealm minimal armor requirements for kidney protection with this method). Doing this allows me to choose between running just the lendenier for my body armor, or I can wear additional body armor over top of this for additional protection.  On each side of the lendenier is a reinforced arming point where my chauses are tied to the arming girdle.   Padded ChaussesPointed to the lendenier are my padded chausses. These are again sewed out of a heavy linen shell, padded with wool batting. They have an arming point at the hip, to tie them to the lendenier and one arming point just above the knee to secure my mild steel knee cops.   Knee CopsMy mild steel knee cops were made by a friend of mine, to my specifications so that I could add extra padding to really give my knees some cushion. SCA armor combat has a rule for "hard over soft", meaning that each area should have some form of hardened armor, whether it be steel, aluminum, plastic or even hardened leather, which is backed by padding (different areas on the body have different minimum requirements for padding depth, please refer to the armored combat handbook for details).  My padded chausses met the minimum requirements alone, but as I weigh over 300 pounds, going down on my knees when fighting can be uncomfortable, so I used E6000 glue to secure some additional padding to the back of my knee cop.  Gutter GreavesWhile strikes under the knee aren't allowed in SCA combat, they do sometimes happen, or you trip up in a melee and strike your shin on something or someone and that can hurt, so why not wear armor. I chose to make my greaves out of abs plastic with leather riveted to it to give a splinted gutter greave look. It's an inexpensive, although time consuming way to make some shin protection.     Arm ArmorShoulder Spaulders Shoulder armor is a smart move in the SCA. It isn't required, but dislocated shoulders or a fractured acromion process can be painful and a shoulder spaulders or pauldrons can help protect your shoulders when blows are raining down on you during a press in melee combat. There are several designs of shoulder protection that appear during the 14th century, but mine are designed based off of a leaf spaulder seen in Scandinavian countries during my time period. I made mine larger than historical version to better protect my shoulder, but that was a concession I was willing to make. These are attached either to my coat of plates, or to my gambeson when I wear it.   Due to the straps on my coat of plates (CoP), I couldn't add arming points the way they are on my gambeson, so I designed a leather arming tab that one of the straps from the CoP threads through. This secures the spaulders to the CoP but isn't permanent so I can also just tie them to other arming coats, etc.  Elbow Cops and VambracesIn the earlier periods in the 14th century, arm protection was mostly chainmail sleeves, which is heavy and expensive and alone, will not meet SCA requirements (some people wear hidden elbow cops under chainmail hauberk, but again extra weight for a visual). I chose to protect my elbows, with a set of mild steel soup can style cops which are tied onto either my gambeson, or to a volleyball elbow pad when wearing just a tunic to compensate for hotter weather.  The elbow cop is also secured with a leather strap and buckle to keep it secure in the elbow joint.    The vambrace can be pointed to the elbow cop itself, or it can be pointed to the gambeson or the elbow pad (which I have done here), to give me more flexibility in the arm. Eventually I will add a rerebrace which is a piece that protects the bicep and triceps of my arm, as occasional I'll get hit in that gap. Hand ProtectionMy main concerns of protection in SCA combat are my head and my hands, as life with either of these impaired would be more difficult. Quality gauntlets can be expensive and there are plenty of cheap but unsafe versions out there, so I recommend seeking recommendations from a trusted experienced fighter, not just anyone. Demi-GauntletsA vast majority of SCA fighters start out fighting single weapon and shield, as it only requires demi-guantlets to do so which are much more affordable. Over the years I've tried a few different designs for demi-gauntlets, some which were more protective, but limited my wrist mobility and others which sacrificed some protection for advanced mobility. I made my current pair based off of a design I had seen, but added some protection over my thumb. This is a complicated design that I will probably never build again, but I really like how they turned out.    Shield GauntletWhen running a strapped shield, the hand behind the shield also needs protection, either via a basket/cage or a shield gauntlet. I picked up two different styles of shield gauntlets, one a padded linen glove with with spring steel plates protecting the fingers and wrist joints and the other style is a nylon glove with HDPE plates covering the fingers and wrist joints. I prefer to use a shield gauntlet over a basket as it just feels more comfortable in my hand, but it is an added expense over a basket.     Full GauntletsWhen running a polearm, greatsword, spear or other two handed weapon, it is required to have full gauntlets. As stated, there are some budget options, but not all of these are created equal when it comes to safety. The top of the line for SCA gauntlets are Grettir's Gauntlets which have a premium price tag, but are unequaled when it comes to mobility and protection. Some people buy or make hardened leather gauntlets but these can become soft if not properly maintained. My first pair of gauntlets, while protective, only allowed for a hammer grip on weapons, which limited my hand and wrist mobility to a point I wasn't enjoying fighting. So I searched within my budget and found a Ukranian armorsmith that made a protective, visby style finger gauntlet. Understand that with finger gauntlets comes the increase risk for broken fingers, and some additional requirements to meet standards. My finger gauntlets are made of leather and hardened spring steel, but I had to add additional 6mm of padding between the armor plates and the leather glove to meet the standards as mine do not ground out on the weapon (something I did not want). I used 6mm of anti-concussion foam sewn into a linen shell with wool 2mm of wool batting added (for a total of 8mm of padding) and then glued that to the underside of the plates, covering from my finger tips, thumb, back of hand and wrist. After that I re-stitched the leather glove back into place on the gauntlet and added some additional leather straps to secure the fit to my hand. I've been fighting in these now for 3 years with no problems and I'm extremely confident in their protection of my hands.   Body ArmorWhen I first started fighting, I used the typical SCA ultra-wide kidney belt for body armor (SCA minimums only require protection of the kidneys when it comes to the body). My belt was like 12" wide and made it difficult to bend my torso. Also it did nothing to protect my ribs, sternum or collar bone. Wanting more protection than just my kidney plates/padding sewn into my lendenier, I made a vest based on a Japanese Manchira, which was a soft padded vast with little hexagon armor plates sewn into it. The original design would've protected against cuts and not blunt trauma as much, so I made mine with more padding and larger hexagon plates. It also has arming point to attach my shoulder spaulders and is then covered up by my blue and white surcoat (surcoats and tabards are a great way at hiding non-historical body armor like barrel plastic, lacrosse pads, etc). 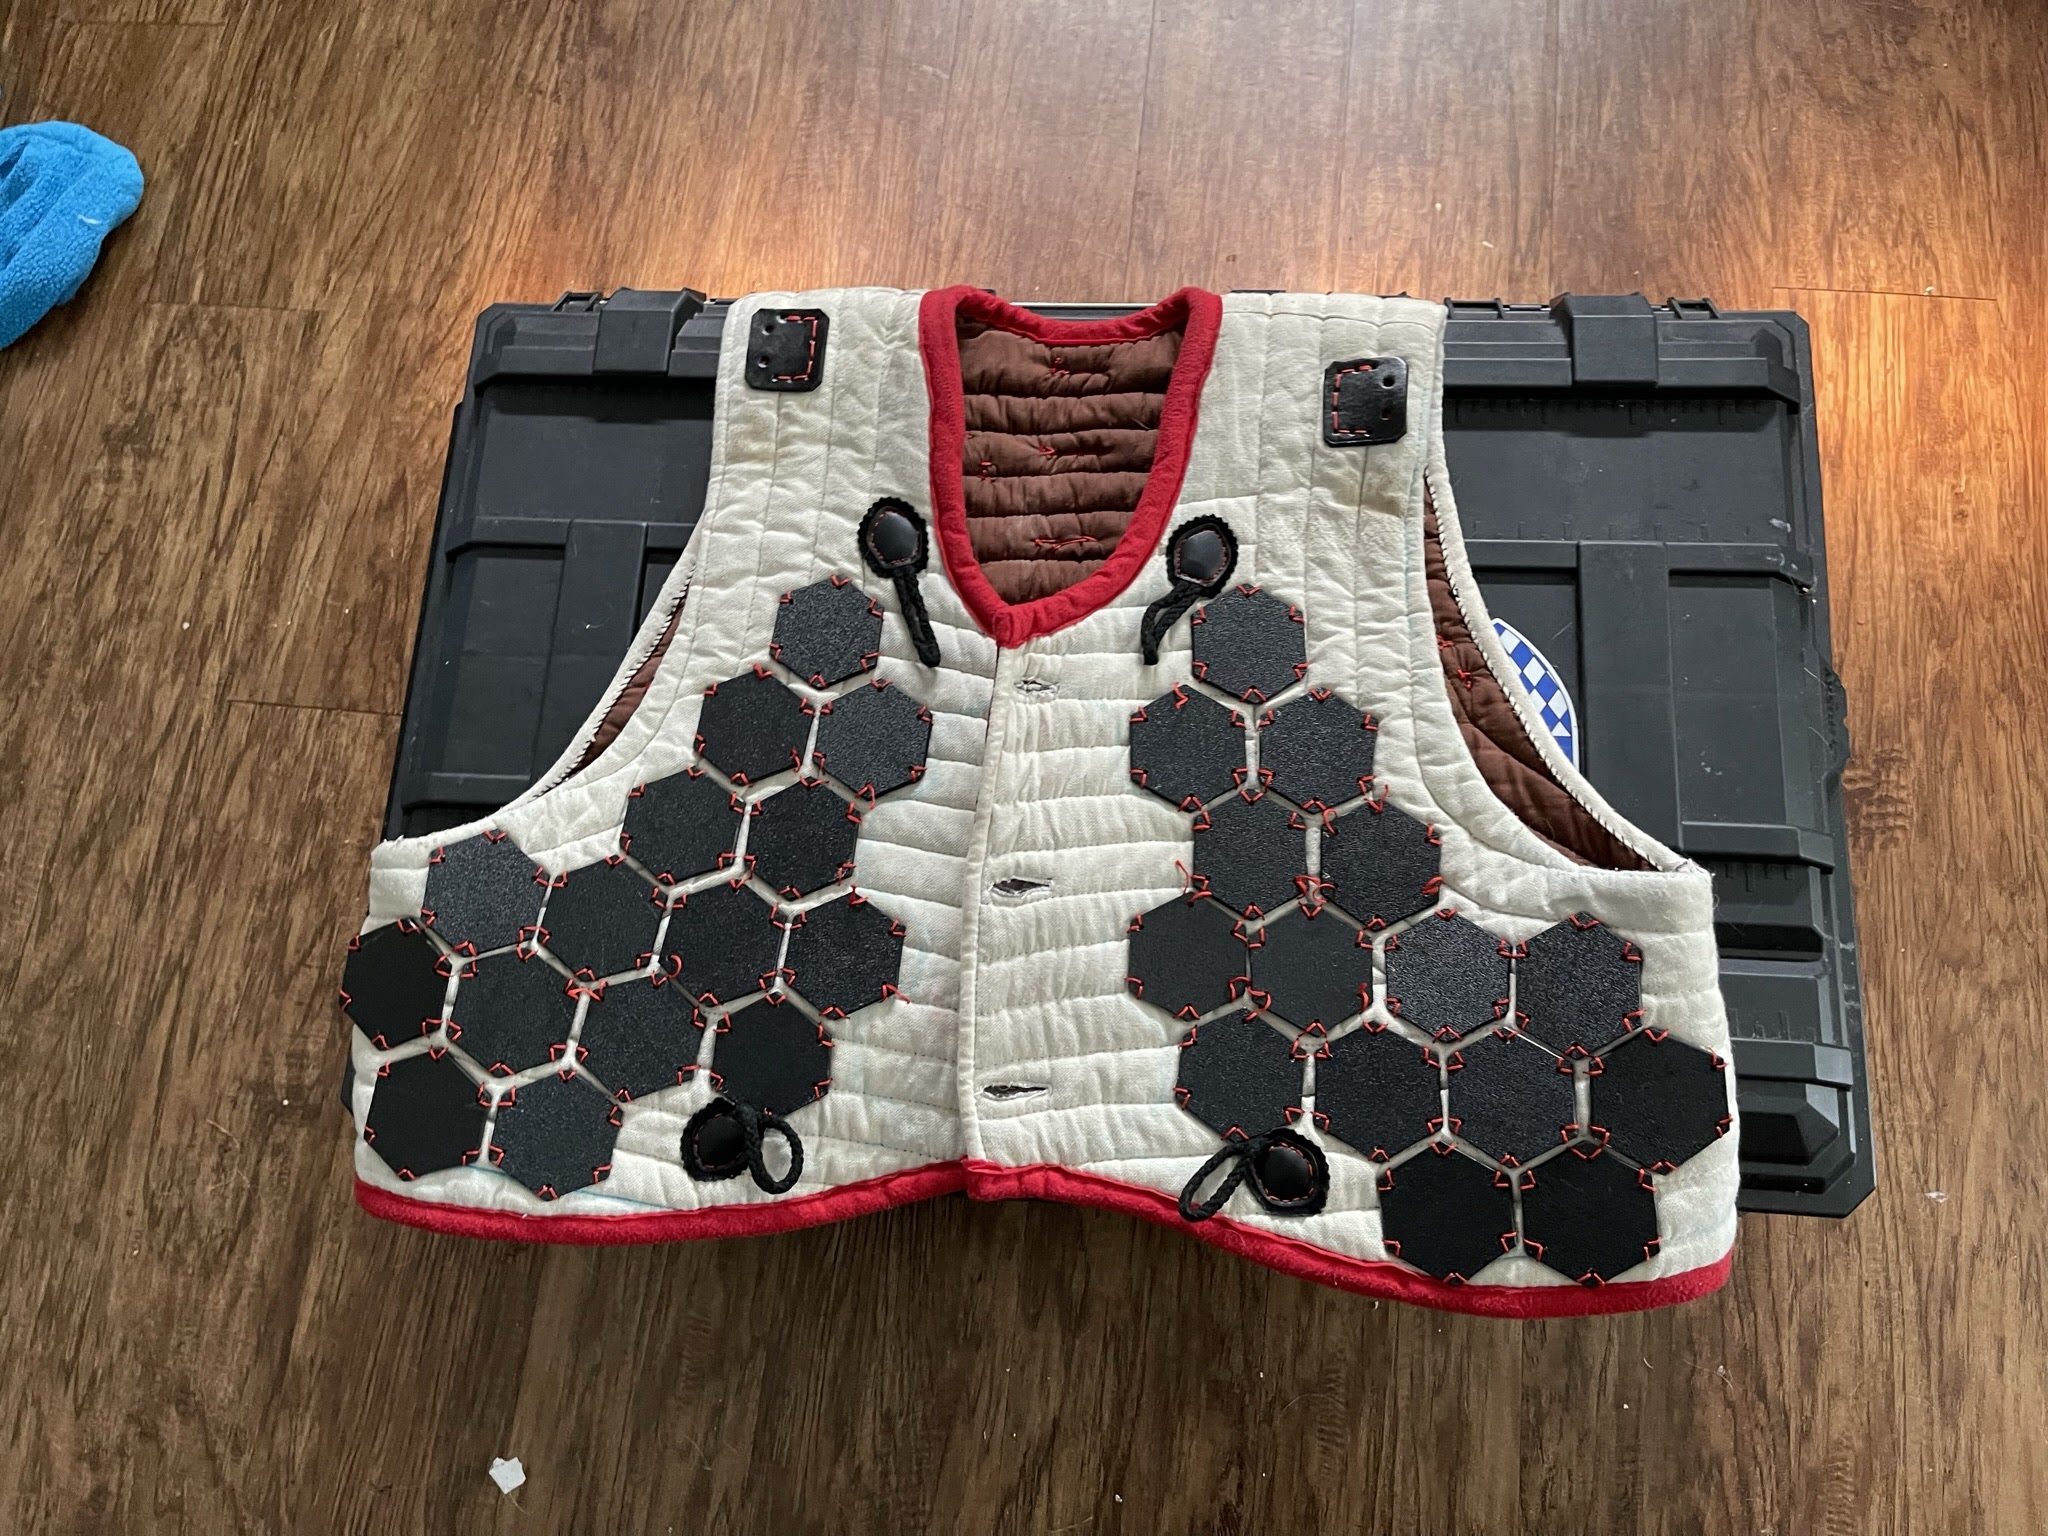 Plates protect ribs in in the front, but most of the work is done by the thick padding of this vest (3/4 inch of wool batting).  Overlapping plates along the upper spine and plates covering the shoulder blades. When I want even more protection, like during melees, I use my Coat of Plates, which I purchased. Based off of another Visby find, this CoP is made of 3mm abs plastic plates, with a wool shell. There are ways to make these yourself, but I couldn't beat the price of this one at the time, as it was a prototype of this style with the ABS plastic plates. These can also be purchased with spring steel or titanium plates. Though these can sometimes be warmer to wear, they are super protective and well worth wearing during melees. I cover mine with a surcoat, because the surcoat identifies my fealty to my knight, but they could also be worn over top of a gambeson or tunic alone. 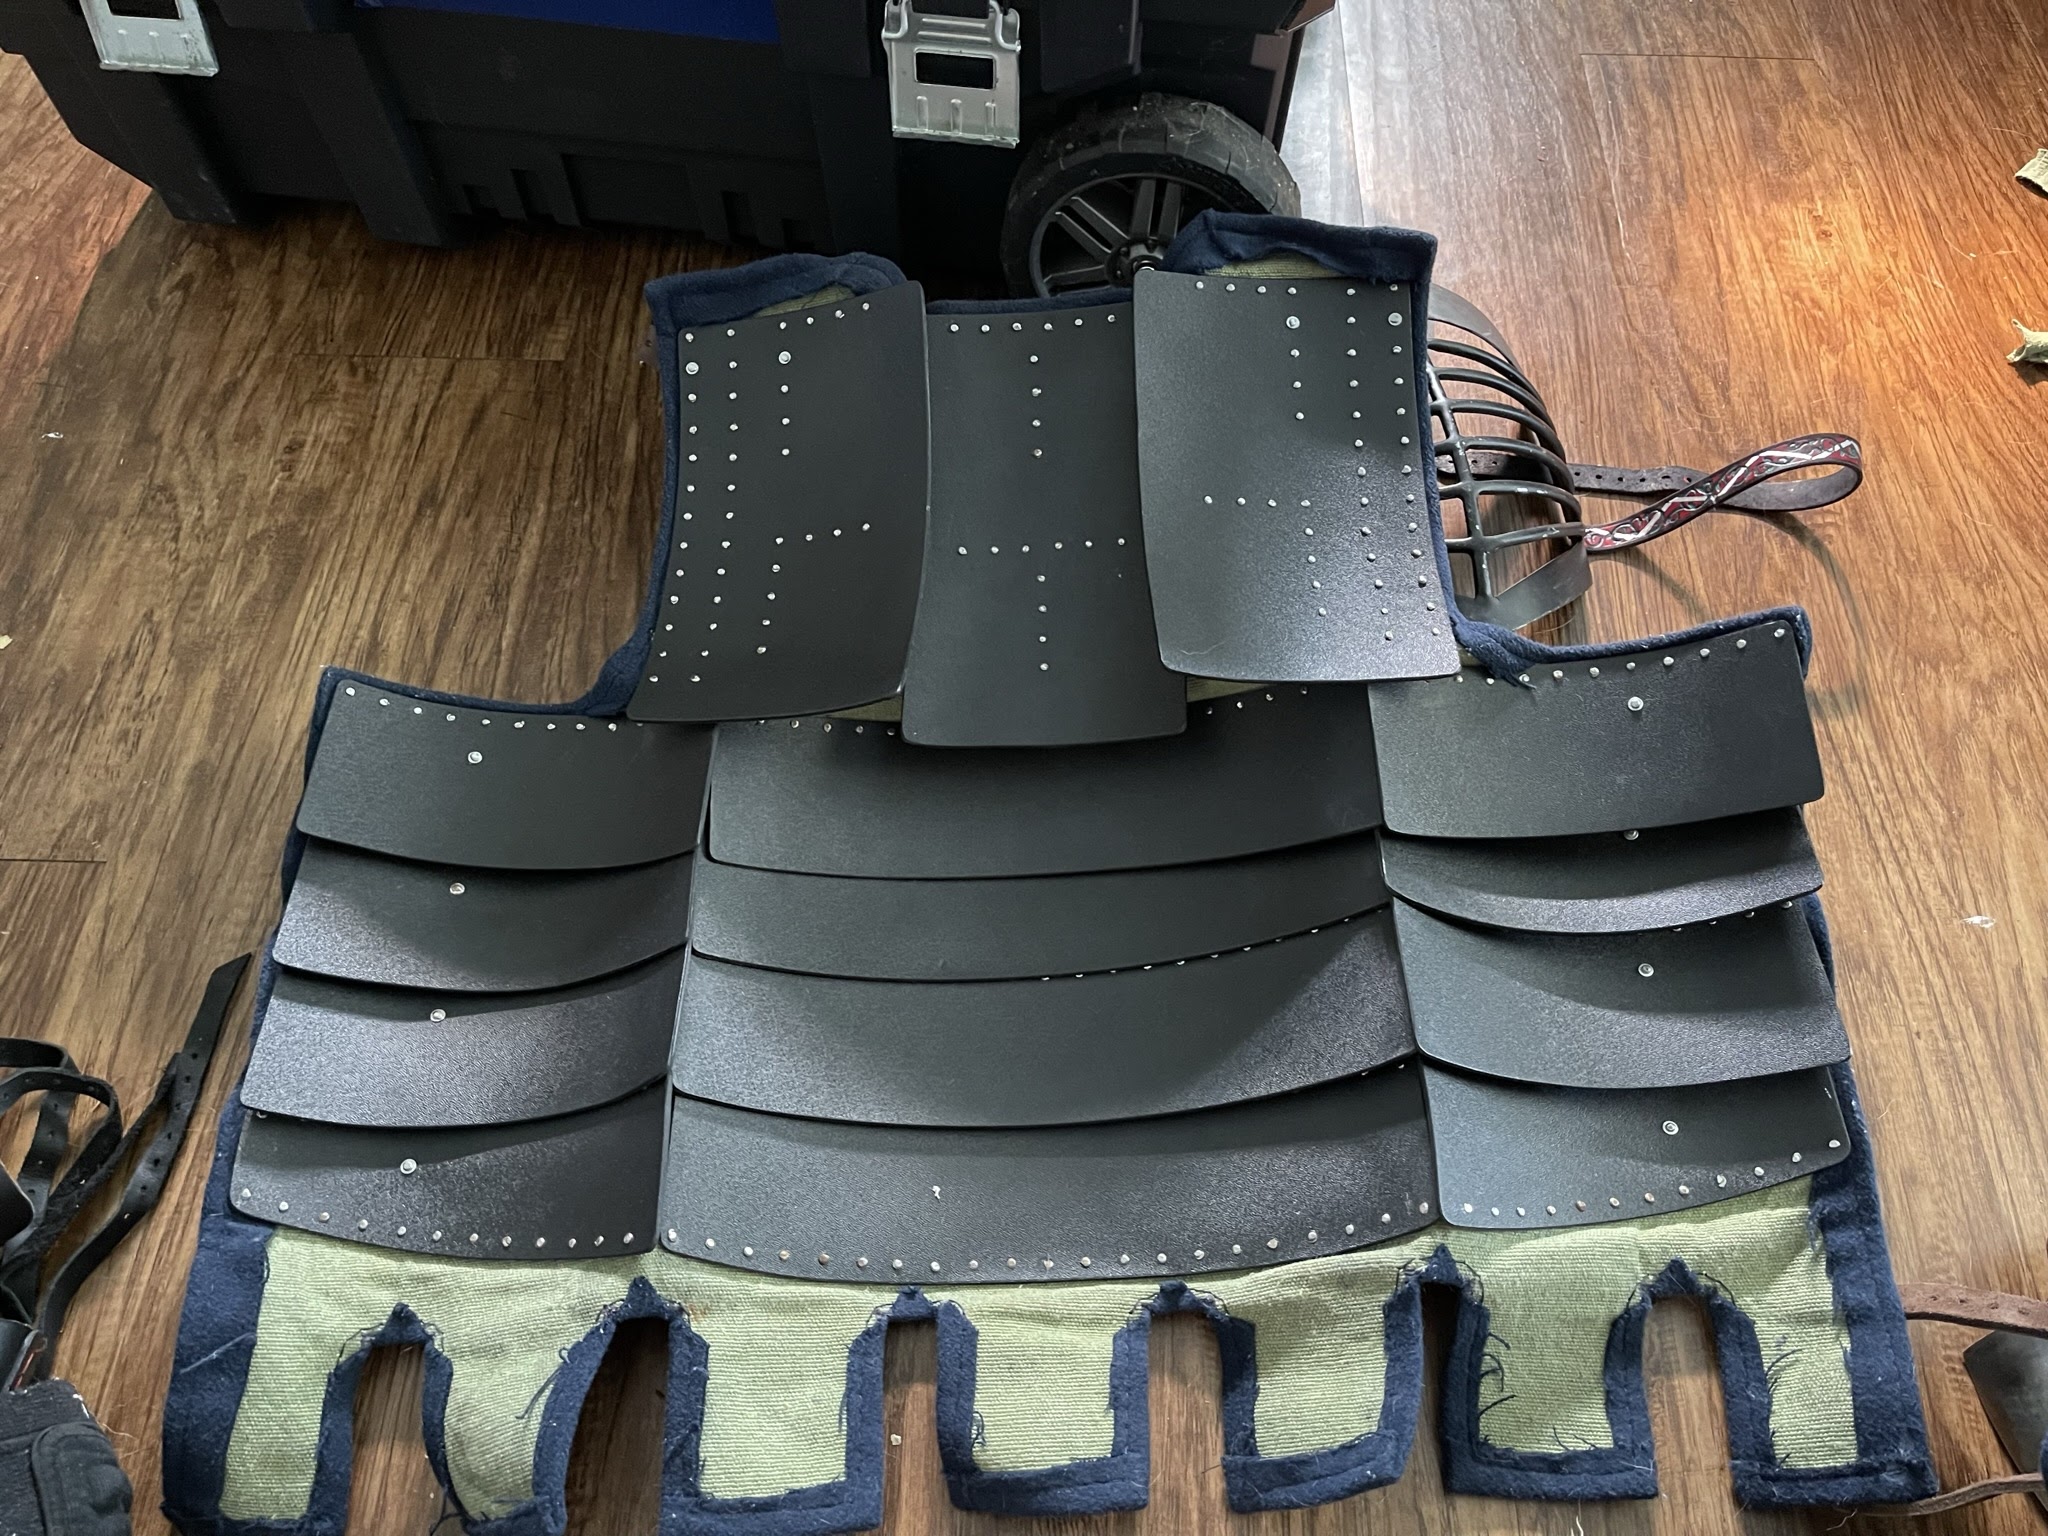   Head and Neck ProtectionFor my persona, either a bascinet or a kettle helmet would be appropriate head protection and I went with the klappvisor bascinet (although the klappvisor is a later 14th century style) I use a standard SCA bar grill visor when fighting majority of the time. The key with SCA helmets is to purchase a solid, 12-14 gauge (if mild steel) helmet from a reputable maker and then use proper padding. For mine, I use a combination of SHOCKtec® Air2Gel foam (1/8") and Team Wendy EPIC® Liner System, which consists of 1/2" anti-concussion pads designed for impact protections. Then I covered my pads with a helmet liner made from tropical weight wool, to make it look more historical and to soak up some sweat. My helmet padding cost me roughly $100, but I am extremely confident in it. My padding at the smallest depth is 5/8" but is 3/4" throughout most of the helmet for both comfort and protection. Don't go bare minimum where your noggin is involved.     For neck protection, I have one of "That Guys Gorget's", which is an excellent gorget. He has since retired but he trained another maker to pass on this design and they can be purchased online. I do have the issue that many fighters won't have that I have almost no neck. I'm all shoulders and head, so majority of gorgets do not fit me, as they are too tall. I modified the front plates in my gorget to be smaller in height, but still found I was getting choked out.   Per Midrealm rules (at the time of writing this, 07/04/2022): |
1. The helm.
2. A gorget of rigid material.
3. A mail or heavy leather camail or aventail that hanges or drapes to absorb the force of a blow. If the camail or aventail lays in contact with the larynx, cervical vertebrae, or first thoracic vertabra, that section must be padded with a minimum of 1/2 inch (6mm) of closed cell foam or equivalent.
4. A collar of heavy leather lined with a minimum of 1/2 inch (6mm) of close cell foam or equivalent.
As I was struggling to wear a gorget and breath, I made sure my helmet has a quality chainmail aventail, and that it drapes appropriately and my cervical vertebrae is covered appropriately. Again, this is the best option for my body, but someone with a neck should really wear a safe and proper gorget.
Bonus Items to keep in your Armor Kit
Two things that never leave my armor box/bag are a sock with silica gel beads in it to help manage moisture and my rust inhibitor spray (WD-40 Specialist corrosion inhibitor or Fluid Film), as majority of my kit is mild steel. You may also consider chucking in some wet wipes and deodorant in the old armor bag, so you can cleanup after fighting to prevent the suffering of your companions during post fight hang outs....or not it's up to you how much you like them. My cloth items are stored with garb, not alongside my metal pieces, again to prevent moisture buildup and my armor gets wiped down after each use. Leather is cleaned monthly with saddle soap, and mink oil to keep it from drying out. Inspect your straps, especially those that get sweaty as they can rot and deteriorate, and replace as needed. Maintaining your kit is part of the process, and a habit to form that will help you take pride in your fighting!


Comments
Post a Comment